Rufus video review and video tutorial on how to use it. Actual how-to guide.
Advertisements
Rufus latest version 3.1
Rufus is a free small utility software designed to format and create bootable USB flash drives such as; pen drive, thumb drive, memory sticks, usb keys and SD card. It’s a standalone software, no installation is needed in order to use it. On the first glance, Rufus bootable is very simple with clean UI (user interface) but if you do some exploration it’s full of useful features.
This is very useful on creating OS (operating system) ISO’s bootable. If you plan to flash a BIOS (motherboard firmware upgrade/update) Rufus can help you create DOS usb installation media. We tackle everything on the video above, take time to watch it.
- FREE for personal and commercial use.
- Fast and handy.
- No installation needed.
- Makes USB Flash drive BOOTABLE.
- So far, I did not encounter any issues except that non-bootable ISO and other ISO’s using boot or compression method that’s not supported by Rufus are not accepted.

Rufus 3.1 latest version 2018
Portable Rufus 3.1
Rufus Bootable Features
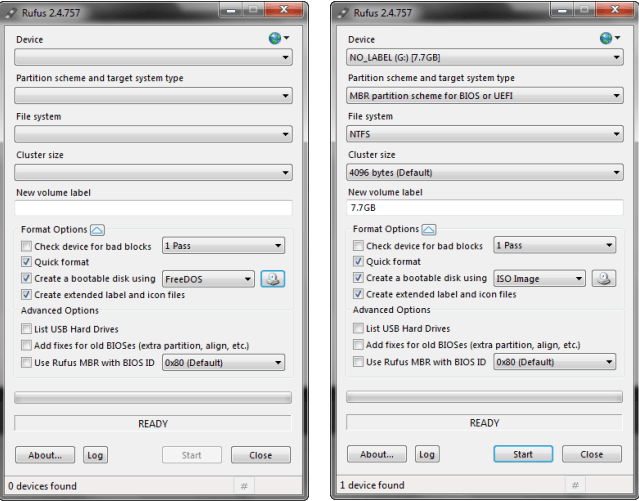
- When you run Rufus for the first time you will see a window like the images below. On the left, that’s the exact dialog box if you execute it without attaching a flash drive in your computer. On the right, it is the default settings when it detects my Flash drive.
Let’s start to explore all of Rufus features. I’m not an expert on this but have had some experience in using this useful utility software. I will try to explain its uses though some are self-explanatory.
Device
- This is where you will see your inserted flash drive/s.
Partition scheme and target system type
Advertisements
- MBR partition scheme for BIOS or UEFI – this option works for me, as what Pete Batard (Rufus developer) this is the safest choice. It can work with BIOS or UEFI computers.
- MBR partition UEFI – Use this if you need to install your Operating System in EFI mode. Usually, this is applicable for new computers that’s already using UEFI.
- GPT partition UEFI – This is also for EFI mode installation but for bigger capacity hard disk. MBR has its limitations up to 2 Terabytes so GPT maybe the only option for 3 Terabytes or higher hard drives.
Note: MBR partition scheme for BIOS or UEFI is the best option. However if you need an EFI mode installation, check your Computer’s Manual before applying the other options.
Notes on UEFI & GPT support (according to the Rufus developer):
Since version 1.3.2, Rufus support UEFI as well as GPT for installation media, meaning that it will allow you to install Windows 7, Windows 8 or Linux in full EFI mode. However, Windows Vista or later is required for full UEFI/GPT support. Because of OS limitations, Windows XP restricts the creation of UEFI bootable drives to MBR mode.
Tips: It’s been said that UEFI will replace BIOS in the future, same goes to MBR it will be eventually replaced by GPT in the coming years.
Advertisements
- BIOS – Basic Input-Output System.
- UEFI – Unified Extensible Firmware Interface
- MBR – Master Boot Record.
- GPT – GUID Partition Table.
- What is the difference with Boot BIOS and BOOT UEFI? click here.
- What is the difference between BIOS and GPT? click here.
Rufus Bootable Supported File System
Rufus bootable supports almost all types of commonly used file systems such as FAT, FAT32, NTFS, Exfat and UDF.
- FAT – File Allocation Table used by Flash drives predecessor of FAT32.
- FAT 32 – File Allocation Table 32 bit widely used by new Flash drives model.
- NTFS – New Technology File System this is the most common hard drive’s file system.
- Exfat – Extended File Allocation Table, seems to be the next generation of FAT32. Higher capacity flash drives and some external HDD most likely have this as its file system (more info).
- UDF – Universal Disk Format commonly used by DVD’s.
In creating bootable flash drives from ISO image, you don’t have to worry on what file system to use. Rufus will automatically detect the appropriate settings for you.
Cluster size
USB Flash drive cluster size is automatically detected. It supports from 32 kilobytes and higher.
New volume label
Rufus bootable gives a new label name to your USB drive whenever bootable USB drive is successfully created.
Format options
- Check device for bad blocks – enabling this option may be time consuming and not necessary if you have a new or reliable flash drive. Rufus will check your Flash drive for any bad blocks/sectors, if it found any, you will be prompted but so far Rufus doesn’t offer any fix.
- Quick format – default settings for faster format.
- Create a bootable disk using – select the appropriate image that you want.
- Create extended label and icon files – to allow the display of international labels and creation of autorun.inf.
Advance option
- List USB Hard drives – this will will Rufus detects external hard disk but not recommended by the author.
- Add fixes for old Bioses – If you are having old BIOS which having boot detection with your bootable USB drive, this is a good workaround.
- Use Rufus MBR with BIOS ID – installs an MBR that allows boot selection and can mask BIOS USB drive ID. This will let MBR to swap the device ID of Hard disk and USB drive making the installation seamless just like you installed the OS from CD/DVD (This is for Windows XP only).
By default the advance option is unchecked because you can create bootable USB drive without those options enabled. So, it is only intended for advance users that has old PC’s and OSes that may need the said option customization.
How to create BOOTABLE USB drive using RUFUS?
- Insert your Flash drive (recommended: blank with 4G capacity for OS).
- Run RUFUS (it automatically detects best settings for you).
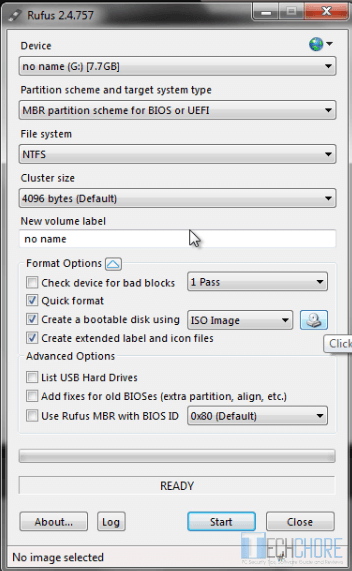
- Browse and select your ISO image by clicking the “CD icon”.
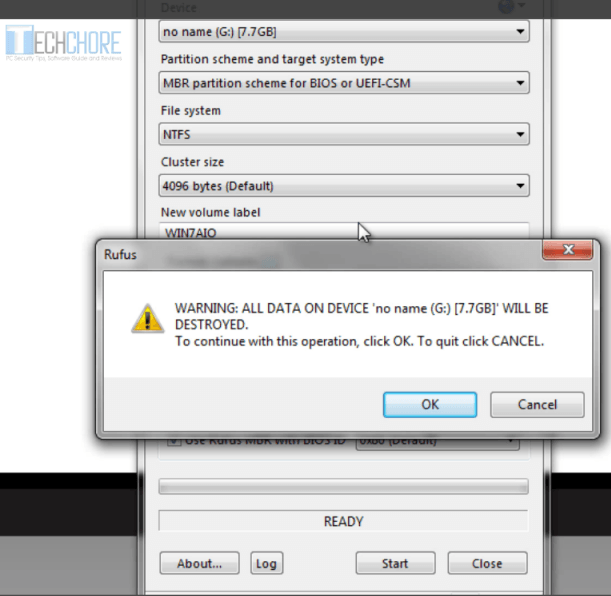
- Then click “START”, a dialog box appears informing that all your data will be destroyed, just click “OK” to begin the process.
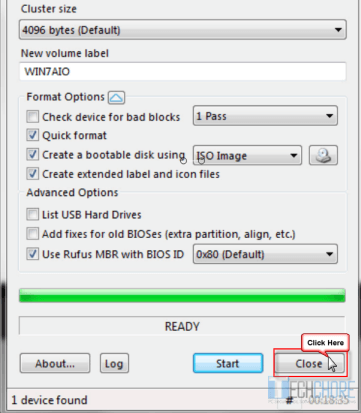
- Wait until Rufus completed the installation. Then simply “Close” the dialog box.
- That’s how easy it is to make BOOTABLE USB drive using ISO image. It took Rufus about 18 minutes to complete using 3.9 G ISO but this may vary on different devices especially for new one.
How to create Bootable Flash drive using RUFUS with DOS?
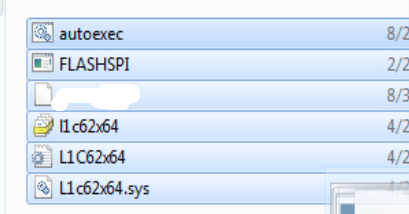
- Prepare your needed files. In the image below, it’s my motherboard’s BIOS firmware update system files. Yours may be different.
- Run Rufus, usually you don’t have to change anything but see to it that the file system type is either FAT or FAT32 or else change it.
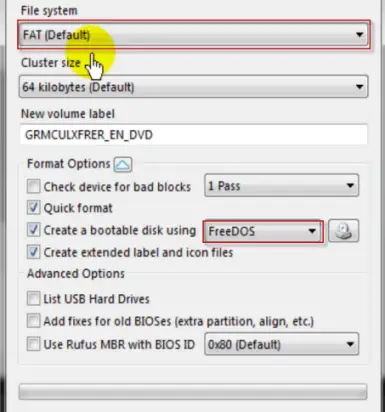
- Then click “START“, wait for a few seconds until Rufus finished creating the needed files to make your Flash drive bootable like the image below.
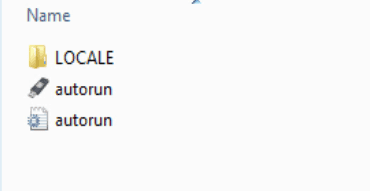
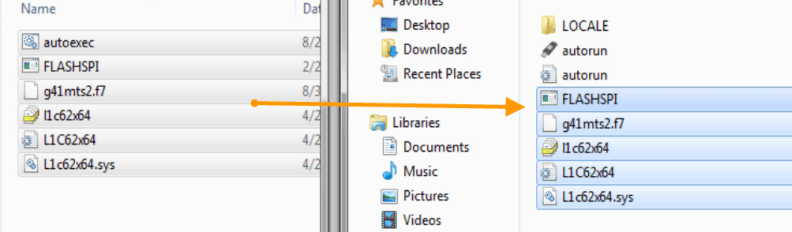
- Copy your files into the root directory of your Flash drive, when we say root it’s inside your flash drive not inside any folder.
- That’s it, you just finished creating bootable flash drive using Rufus with DOS. You can now “Restart” your computer, change your “Computer’s Boot priority“, after that you are now boot your DOS based files.
So far, this is one of the best free utility software that I tried. How about you? Have you tried Rufus Bootable on creating bootable USB drive? Share us your experience in the comment box below. It will be highly appreciated.
July 28, 2016 at 12:49 pm
Good review, thanks. However, you said at the beginning that the only con you’d experienced was the “… non-bootable ISO and other ISO’s using boot or compression method that’s not supported by Rufus.” which is the same error I have. What did you do to resolve it?
Hi Maggie, I resorted to use other utility programs such as; WinISO and powerISO.
Issue: Forgot my Windows 7 password. I was trying to find a bootable start up disk that would allow me to access my computer’s hard drive to reset my password. I followed the instructions for RUFUS and it only recognizes my flash drive as the only drive. It says, “Volume in Drive C: is USB Disk.” Can I work around this?
Hello Dawn, Rufus’ function is to create a bootable flash drive that’s why it only detects your flash drive. Using Rufus to access your hard drive is not possible. But if you use Rufus to create a bootable ISO such as Hirens iso, parted magic iso or even windows, it will serve its purpose. With regard to your problem please see this http://www.isunshare.com/windows-7-password/how-to-reset-windows-7-password-without-reset-disk.html.