Share a Folder in Windows 7?
If you only have one (1) computer, sharing a folder doesn’t make sense. However, if you have a network of computers, small or big, sharing your file and folder does a very big sense.
Advertisements
What does sharing a folder can do?
Sharing a folder in Windows 7 can help you copy files from one computer to another, without walking through each PC, all you have to do is to network that certain computer, and copy what you need. It saves time and effort.
How to share a folder in Windows 7?
In the previous OS (Operating System), the windows XP, sharing a folder wasn’t complicated. All you have to do is to “right click” the folder you want to share on your network, choose “sharing”, select “share this folder” and you are ready to go. In XP, you are given two options to share a folder, share it as “read only” or “allow network to read and write”. Basically, the former is the most preferred for security reason.
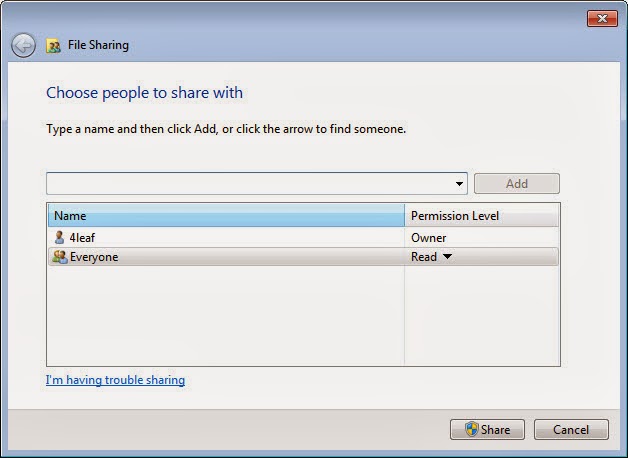
In Windows 7, sharing a folder isn’t hard as well. However, you need to do extra steps to complete the sharing process. Follow these simple steps:
Advertisements
- Right click the folder you want to share.
- Click properties and navigate to “sharing” tab.
- Click “share” a pop up window appears.
- In the drop arrow menu, choose people to share with, “everyone”, “guest” or you can create new users. Then, set a permission level, whether you allow them to “read and write” or “read only”.

- In this tutorial, I choose “everyone” then click “add” followed by “share” another pop up window appears.
- In the pop up window, you are given the option to choose private network or public network sharing.
- Choose what’s appropriate for you.

Congratulation, you successfully shared a folder in windows 7.

- Now that you shared the folder, let’s go to “Network and Sharing Center”.
- Right click your shared folder and select “properties”.
- Click the link at the bottom “Network and Sharing Center” a window should appear as what the image shown below.

As you can see, there more options on how should you share your folder on the network. Take note, the previous sharing procedure above, will of no-effect if we will leave “Network and Sharing” to its default settings.
What options should you choose to completely enable your folder sharing?
- Turn on Network Discovery. This will make your computer visible to the network.
- Turn on File and Printer sharing. This will make your file and printer open to the network.
- Turn on Sharing so anyone with network access can read and write in the Public folders.
- Turn off password protected sharing.
Now, you can connect with your shared folder from another computer with no problems.
Disadvantages of sharing your folder on your network.
Sharing is loving. However, if you are not careful, it may lead to disaster instead of a help. When, sharing you must:
- Share only the public documents.
- Never ever open your confidential records on your network.
- Choose only those computers that can see your files and folders.
- Enable your built in Windows Firewall.
- Make sure that your Antivirus is updated to avoid spreading the virus on your network, just in case one of your computer will get infected, because the virus can easily travel to network computers and folders, if it is shared.
Do you have some idea of sharing a folder in Windows 7? Please share it with us, we want to hear from you.
Advertisements
Advertisements