
Advertisements
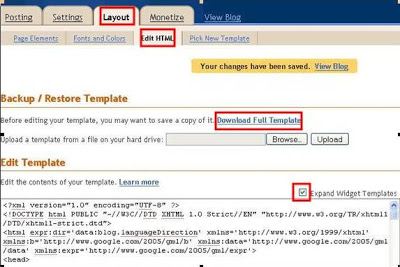
Now, are you ready?Check the “Expand Widget Templates” and look for “<data:post.body/>“. In my case I’ve got two “<data:post.body/>“ in my template, one for my post summary script and the other is for the post body. So, if we have the same situation go to the second “<data:post.body/>“. Under or just after it, paste the codes given inside the box below.
Other options on where to put the bookmarking codes, below or after these lines:
<div class=’post-footer-line post-footer-line-1′> (many prefer this)
Advertisements
<div class=’post-footer-line post-footer-line-2′> (I did not try this)
<div class=’post-footer-line post-footer-line-3′> (This is where I put my bookmarking codes)
Note: Replace the (#) in this code with your image URL.
Are we finished? Not yet!
Download your icons here:
After you downloaded the file extract it using winrar or zip. Please take note, this file has more icons than we actually need, just select the applicable icons for this tutorial such as facebook, mixx, yahoo, reddit, stumbleupon, delicious, technorati and digg. It has two sizes, choose those fits your blog. For me I prefer the 32 x 32. Now upload it to your photobucket account or tinypic, wherever. Then get the html code of your icons, it will look like this <http://i671.photobucket.com/albums/vv77/sample/mixx.png> on Photobucket and this <http://i28.tinypic.com/f9l8g3.jpg> on Tinypic . Replace the sharp (#) symbol in the given codes with your icon’s html code or url accordingly.
Advertisements
There you have it; it’s time to save your template. If you follow the instructions right, the result would be the mirror of my own social bookmarking buttons as what you can see at the bottom of my post.
Advertisements