System Restore in Windows 7
System Restore is a built in feature of all windows operating systems, from Windows XP, Vista, Windows 7 and Windows 8. Its purpose is to restore the previous good computer system configuration (when it is needed) without losing your personal data, like your email, documents and images of precious moments.
Advertisements
System Restore Windows 7, is sort of a computer system back-up (but it is not) that can be used in case of unexpected computer troubles. It is very simple to use, in just a matter of 8 clicks and less than 30 minutes you can bring back your computer to its known working configuration.

How to create a System Restore Point in Windows 7?
System Restore cannot run without a Restore Point. So, make sure to have one. For us, System Administrators, it is our SOP (Standard Operating Procedure) to always make a Restore Point after we Install Windows 7 Operating Systems or Reformat a Computer.
The first thing you should do, is to turn on the Hard Drive’s System Protection.
Advertisements
Right click “My Computer” ———>>> Click “Properties” ———>>> Select “Advance System Settings” ———>>> Go to “ System Protection Tab” ———>>> From there, click the Hard drive or the Partition that you want to have the System Restore turned on ———->>> Then, click “Configure” ———->>> Tick the “Restore system settings and previous versions of files” ———>>> Finally, strike “Apply or OK”.
Now, you are rest assured that the System Protection will automatically make a Restore Point as per scheduled. However, do not rely on that, do a manual creation of System Restore.
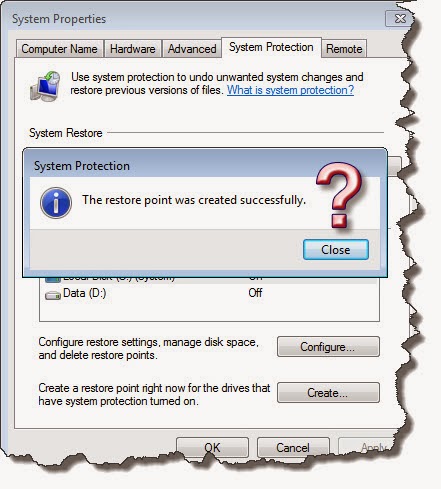
Right click “My Computer” ———>>> Click “Properties” ———>>> Go to “ System Protection Tab” ———>>> Then, click “Create” ———>>> Type your desired Restore Point name and hit “Create” ——–>>> Wait for the confirmation ——–>>> You should see a message “The Restore Point was created successfully” and you are done. You just made a Restore Point for future System Restore.
What Computer Problems does System Restore may be helpful to use?
- System Restore in Windows 7 is a very good at solving computer troubles made by software installation, corrupt drivers and wrong driver installation.
- System Restore also helps removes present viruses by restoring the computer to the time that the computer wasn’t infected yet. That’s why, if you noticed, new viruses, prevents you from using System Restore in Windows 7 and safe mode, to protect itself.
- System Restore can resolve Windows 7 Services.
In my experience, my client is complaining about her internet connection, it cannot acquire network address. I know it is DHCP issue, so I went to windows services and found out that the DHCP wasn’t started. However, when I start it, it won’t run. So, I decided to System Restore it and voila! The PC’s internet connection problem was solved.
Advertisements
I would love to hear from your own experience about System Restore. Did it really help you solve your computer system problems?
January 6, 2017 at 5:14 am
Thanks, very comprehensive tutorial on how to create System restore on Windows.